In a new series on 21st Century Burlesque Magazine, fabulous costumer, blogger and performer Viv Clicquot shares valuable tips and tricks, continuing with tackling those pesky rhinestones!
So this is a post about the things I learned the hard way when it comes to using Gem-Tac to apply rhinestones. In chatting with other performers, I was relieved to discover that many of them had to go through an expensive learning curve as well. Let’s face it, those crystals are way too expensive to lose half of them the first time you wear a piece. Right? Right.
So I will start you off with a super short video clip showing you rhinestone application in real time. Then I will break down the individual supplies and simple tricks. And because I’m evil, I’m posting the most important tip at the very end of the post.

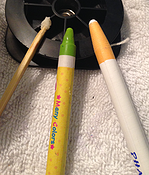
Okay. So now that you see how easy it is, here’s what I have found regarding applicators. In the past I have used a wide variety of waxes on the end of a bamboo skewer. Dental wax, candle wax, paraffin… you name it, I’ve used them all with varying success. I have even used crayons straight out of the box. If any of these work for you and you are happy with them, GREAT! Here’s just another option for you.
My absolute favourite, go-to applicator now that I’ve discovered it, is one I will now never stray from. It’s the white pencil you see on the far right of the image. It is what’s known either as a grease pencil or china marker and I buy mine in boxes of 12 from Staples. For me it is the absolute perfect degree of sticky to pick up any size stone from ss6 to ss30. With just a little paring knife or even the edge of a scissor you can easily shape the tip of this pencil to whatever size you need and it holds that shape no problem. My issue with all the wax options I tried was that I found it difficult to make a small point that was still strong enough to hold its shape when repeatedly picking up hundreds of rhinestones. I also prefer to hold something in my hand that is more like a pencil than either a chop stick or skewer. I find it more comfortable to use for hours on end. Yes. Hours.


One of the things I liked about using the bamboo skewer, though, was that I could easily use the other end of the skewer to position the rhinestone if I needed to. I accomplish that very easily by sticking a pin into the end of the grease pencil, and bending it with a pair of pliers. Plus, that way, if it gets gummed up, I can just pull it out and stick a new pin in. Easy.
You may also have noted in the video how easily I was able to control the amount of glue I put down. I covered that topic in a previous blog post which can be found here.

Okay, so here is THE most important thing I can teach you about applying rhinestones, and the most common mistake I have heard of time and again.
Look at this super tight shot of the trim I was rhinestoning in the video clip at the start of this post. The top crystal is applied INCORRECTLY, whereas the bottom one, sitting in a puddle of glue is CORRECT. Very simply, when the glue on the lower crystal dries, it will also shrink, making a nice tight cup around your stone. THAT is what holds it in place.
When I first started this addiction of mine, my very first project was to bedazzle a pair of can can boots. Which I did. Painstakingly. I made sure that I put down JUST enough glue so that the stone sat neatly upon it with no glue seepage around the edges. Like the top stone in this pic. WRONG. SO wrong. As I learned as soon as I wore my beloved boots and the stones started popping off left and right. I swore at this legendary Gem-Tac and thought someone must be playing a trick on me. Because this Gem-Tac did NOT work. Again. I was WRONG.
To be fair, freshly applied stones in a puddle of glue looks messy, and to me, it looked outright scary. “My piece is just going to look like a mess of glue! I’m covering up the shine of the stones! I must make sure no glue is visible!”
Obviously, I now know differently. But I seriously tried a dozen different glues and even as I bemoaned my woes to others in the glitter-tribe, not once did anyone think to question HOW I was applying the glue. GAH! I can only assume they just thought I knew better. If you don’t believe that this haphazard mess of glue will truly not be visible… scroll down and behold the piece of lace once it dried.

See? I would never lie to you. There is no evidence of the glue I applied just 20 minutes ago and those babies aren’t going anywhere. I’ve even thrown pieces in the washing machine with no problem. Just do NOT put it in the dryer or the glue will melt.
Hope this helps! If you have any questions, just drop them in the comment box on the main Tips&Tricks page.
Cheers,
Viv

About Viv Clicquot
Hi there, I’m Viv Clicquot! Although I’ve been performing in some variety or other for most of my life, it wasn’t until I stumbled across the incredible organisation that has become my burlesque family, Screaming Chicken Theatrical Society, that I discovered this amazing form of entertainment.
Five years later, after having graduated from Screaming Chicken Theatrical Society and their Becoming Burlesque program, I have had the pleasure of competing at the Burlesque Hall of Fame in Las Vegas and various international festivals, including the Vancouver International Burlesque Festival , Edmonton Burlesque Festival and the Munich Burlesque Festival.
I hope you find something useful or entertaining as you peruse my tips and tricks about makeup and costuming, and if you have any particular topics you would like me to address, just drop me a line.


